How can you deal with software bugs efficiently?
Summary
This blog provides a comprehensive overview of the defect life cycle in the context of software testing. It explains the different stages of a defect and emphasizes the importance of understanding the defect states. The article defines what a defect is and its significance in the testing process. It also differentiates between a bug, defect, and failure. The defect life cycle is described as a process that starts when a bug is detected and ends when it is closed. The various states of a defect, such as New, Assigned, Open, Fixed, Verified, and Closed, are explained in detail. Best practices for implementing the defect life cycle are discussed to ensure effective defect management. The article concludes by highlighting the increasing scope of defect handling and testing due to evolving software and technology trends.
Table of Content
In this article, we will go through the life cycle of a defect. It will make you aware of the various stages of a defect. Any tester must deal with these while working in a testing environment.
It is important to know about the various states of a defect. This will help understand the defect life cycle. The main reason for performing a testing activity is to check whether the product has issues or errors in them.
During testing, we need to keep three groups in mind:
- Customer
- Developer
- Tester
What is a defect?
A defect is non-conformance to requirements. It is an error or a bug, in the application which is created. A Defect, in simple terms, is a flaw or an error in an application. It restricts the normal flow of an application. There is a mismatch in the expected behavior of an application with the actual one.
A defect refers to an error that occurs because of the mistake made by the developer during the designing of the application. Such errors are termed as defects by the testers. Mistakes can happen during requirement gathering, coding, or while making test cases. While making test cases the expected behavior may not be stated clearly. These can be caught in different rounds of testing. Usually, we have at least two rounds of testing. After this, there will be User acceptance testing and go-live.
A tester is responsible for the thorough testing of an application. It is the responsibility of a tester to do thorough testing of an application. Testers need to find as many defects as possible to ensure that a quality product will reach the customer. Test cases should cover all possible scenarios. Inputs, outputs, and expected behavior should be clearly defined.
Bug vs Defect vs Failure: Testing is the process of identifying defects. The defect is any variance between actual and expected results. "Error" is a mistake in code. Error found by the tester is termed as a defect. The defect accepted by the development team is called Bug. A defect found by a customer is a failure.

It is important to understand the defect life cycle before moving to the workflow and different states of the defect.
What is the defect bug life cycle?
In simple words, a defect life cycle is something that starts when a bug is detected and completes when it is closed. It is also known as a Bug life cycle. It is a cycle of a defect from which it goes through covering the different states in its entire life. This starts as soon as any new defect is found by a tester and comes to an end when a tester closes that defect assuring that it will not get reproduced again.
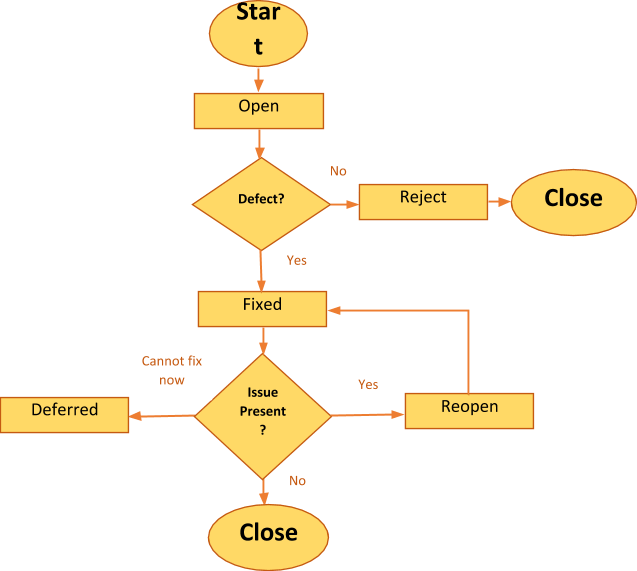
It is now time to understand the actual workflow of a Defect Life Cycle with the help of a simple diagram as shown below.

Defect States
- New: "New" is the first state of a defect in the Defect Life Cycle. When any new defect is found, it falls into a “New” state. It then undergoes validations and testing in the later stages of the Defect Life Cycle.
- Assigned: In this stage, a newly created defect is assigned to someone responsible for removing this defect. Generally, it would be the development team working on the defect. This is assigned by the project lead or the project manager of the testing team to a developer.
- Open: Here, the developer starts analyzing the defect. If it is really a defect, then he works on fixing it. At times, the developer may feel that the defect is not appropriate. He then puts it to any of the below four states, namely, Duplicate, Deferred, Rejected, or Not a Bug-based upon the specific reason. We shall discuss these four states in a while.
- Fixed: The developer makes the required changes and finishes the task of fixing a defect. It goes to the “Pending Retest” status. It is re-tested by the tester and checked to ensure it does not re-occur. Once done, he will mark the status of the defect as ‘Fixed’.
- Pending Retest: After fixing the defect, the developer assigns the defect to the tester for retesting the defect. Until the tester works on retesting the defect, the state of the defect remains as “Pending Retest”.
- Reopen: If the issue persists or can be reproduced again, and the defect is not fixed, then it is put in the status “Reopen”. It will be assigned to the developer again with testing results. The developer then must work on fixing it.
- Verified: This status tells that the defect has been fixed accurately. The tester did not find any issue with the defect after the developer fixed it. The tester would then set the status of the defect as ‘Verified’.
- Closed: When the defect does not exist any longer, it is put in the status “Closed” by the tester. This is the final stage.
Few More:
Rejected: At times, the requirement may be fulfilled. There may be some gaps in understanding by the tester. The test script may not have captured the expected behavior appropriately. Developers may not consider it a defect. He would provide reasons and mark the status as ‘Rejected’.
Duplicate: Duplicate means another defect already exists addressing the same issue. The developer may find another defect that is the same as the reported defect. The concept of the defect may match another defect. In such cases, the developer would change the status to ‘Duplicate’.
Deferred: Sometimes, it may not be possible to fix a defect due to some reason or dependency. At times, the defect may not be important and can be fixed in the next phase or release. In such cases, the developer would change the status of the defect to "Deferred"
Not a Bug: This indicates that there is no impact on the functionality of the application. The developer then changes the status of the defect to ‘Not a Bug’.
Now with this background, let us dive into the defect bug life cycle. There are some mandatory fields a tester enters when logging a new bug. These are Build version, Submit On, Product, Module, Severity, Synopsis, and Description to Reproduce. In the above list, one can add some optional fields. These Optional Fields include Customer name, Browser, Operating system, File Attachments, or screenshots.
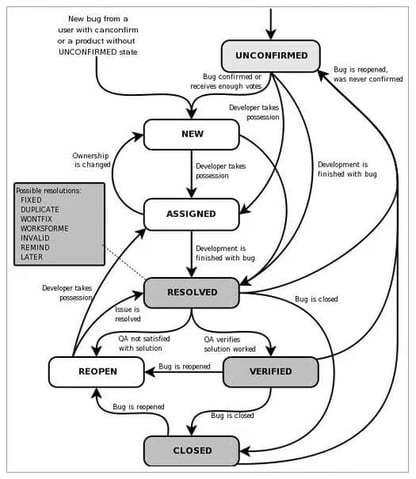
Defect cycle

The above diagram is quite detailed. It considers the significant steps in the Bug Life Cycle. You will get a quick snapshot.
Once logged, the bug is reviewed by the concerned person. Usually Development or Test manager. After setting the bug status as open, the test manager can assign the bug to the developer or defer it until the next release.
When a bug gets assigned to a developer, he/she will review it. He can start working on it. He can change the bug status as ‘Will not Fix’,’ Could not Reproduce’, ‘Need more information’, or ‘Fixed'.
QA responds with a specific action when the bug status is set to either ‘Need more info’ or Fixed. Once the bug is fixed, then QA verifies the bug. He then sets the bug status as verified closed or Reopens.
Best Practices for Implementing Defect Life Cycle
Some best practices can be adopted before starting to work on the Defect Life Cycle.
- It is critical that before starting to work on the Defect Life Cycle, the whole team understands the different states of a defect.
- Defect Life Cycle should be properly documented to avoid any confusion in the future. Ensure everyone who has been assigned any task related to the Defect Life Cycle, should understand his/her responsibility clearly. This will ensure good results.
- Everyone who is changing the status of a defect should be properly aware of that status. They should provide enough details about their status. Detailed reasons should be put for that status. This will help everyone who is working on that particular defect. They will understand the reason for such a status of a defect very easily.
- The defect tracking tool should be handled properly. It should maintain consistency among the defects
Future Scope
Software is evolving and is becoming more flexible. With IoT, more devices are getting added to existing software. This has multiplied the testing requirements exponentially. With Artificial Intelligence and Big Data integration, there are infinite possibilities. So, testing and defect life cycle scope is ever increasing. Automation will take care of some parts of it but there is a great need for subject matter experts. This is ever-increasing. Since as we deep dive into certain applications or industries, we need more insights of functionality to be covered, tested, and bugs detected. With front-end applications, the way users handle the application is changing drastically. We have inputs provided by gestures, scanners, fingerprints, sensors, etc. So, the scope of testing and handling bugs is ever-increasing. This would continue to increase. Old techniques will get automated. New methods will initially be handled manually until volumes indicate automation will help. There is scope in making those automation tools too, which again are ever-evolving.
Every business may have different requirements for defects. It is important to understand the states of defects. Clear documentation and creating awareness of correct usage is essential for effective utilization. Software and functionality being more dynamic than ever have increased the scope of this exponentially. Hope you have gained immense knowledge about the life cycle of a defect. This should help you work on defects in the future in a better manner.


